FAQ Q257: How can I integrate Planyo with my booking.com extranet?
Section: Integrations with other apps and data import/export
Introduction
If you have an account with your properties at Booking.com and you want to integrate it with Planyo, you can use our Booking.com XML Integration extension.
Note: reservations made in your Booking.com account before the connection with Planyo will not be automatically imported. You need to add them in Planyo manually (see 'Booking not picked up by PMS' email or fax message below) or block the reserved periods by adding vacations.
Turning on PMS for your Booking.com property
First of all, you need to turn on Planyo as the Property Management System (PMS) for your property. Follow the instruction in the Booking.com guide.
Log in to your Booking.com Partner Central and choose Account / Connectivity provider from the menu in the top-right of the page. Search for Planyo as the PMS system for your connection. Next, sign up and make an agreement.
Planyo extension setup page
Next, you need to turn on the Booking.com XML Integration in Planyo. Once logged in to your Planyo account, go to the Booking.com extension page in Planyo Store and click
Buy as subscription. Next, click Go to the setup script
to configure the integration.
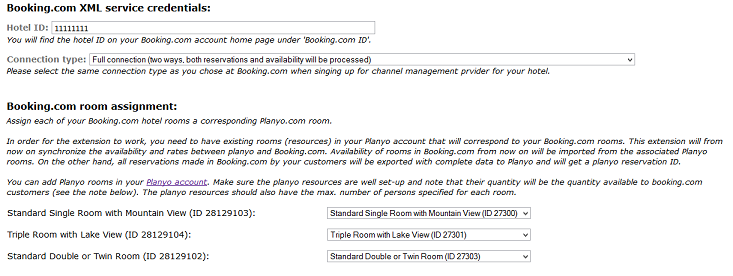
Room assignment
Now, you need to do a matching between your Booking.com hotel rooms corresponding Planyo resources.
Setting up prices and availability limits
Note: if you have chosen the Only reservations (one way) connection type, you can skip this section since you don't
need to set up any prices or upload availability.
Now, you need to initially upload availability and prices for your hotel rooms. Booking.com requires that you have availability for next 12 months uploaded for your property. You can start the
initial upload by clicking Upload availability on the setup page.
Max availability limits
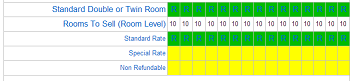
In order to set the availability limits, click Prices and restrictions. At the top of the page, you can switch between your Booking.com rooms to change their settings.

In this case, you need to set the Max number of rooms available in Booking.com (default) value for the room to 10. Click Default limit in the Max Availability Limits section, type 10 as the default limit and click Update. This way, availability uploaded to Booking.com for the room will never be higher then 10.
Prices
Note: the currency of your Planyo site should be the same as the currency set in your Booking.com hotel settings.

Automatic price synchronization
You can have prices for Standard rate automatically imported from your Planyo Pricing Manager and uploaded to Booking.com. This way, instead of entering the prices for Standard rate in the extension,
the prices will be automatically taken from your Planyo settings. Please note that prices for other rates, like Special rate, Non Refundable rate etc. need to specified
in the extension anyway.
Upload of availability
Note: if you have chosen the Only reservations (one way) connection type, you can skip this section since you don't
need to upload any availability.
Now that availability limits and prices of your hotel rooms are defined, you can upload the data to Booking.com. Go back to the Setup page and click [Upload availability].
Once the update is finished, you can go to your Booking.com Extranet and check that everything is uploaded correctly. Note that this initial data upload needs to be done only once.
From now on, all changes to prices and availability will be updated on your Booking.com account automatically (see Potential issues below).
Updates of prices, availability and restrictions
Note: if you have chosen the Only reservations (one way) connection type, you can skip this section.
If you want to change prices for one of your rooms, modify its availability or set up restrictions, you can always do this on the Prices and restrictions page.
Once you submit the changes, the extension will automatically update the data on your Booking.com account.
Downloading reservations
Note: if you have chosen the Only rates and availability connection type, you can skip this section
since you get details about reservations directly from Booking.com via fax or email.
When a reservation is made by a customer on Booking.com, it will be automatically imported into Planyo and visible among other reservations in your Planyo administration panel.
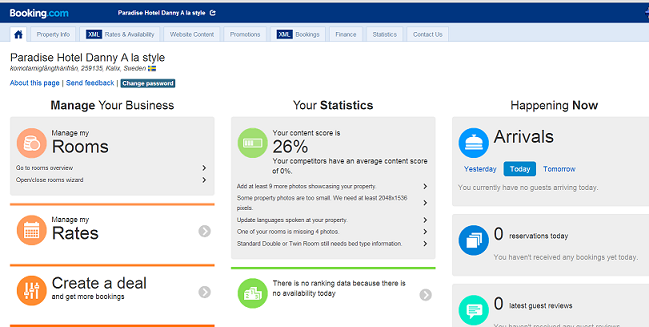
Booking.com Extranet
You can always visit your Booking.com Extranet to verify that the data uploaded for your hotel rooms is correct. You can also check there content, update your commission and
view statistics for your property.
Potential issues
There are some issues that you should be aware of when running synchronization between Booking.com and Planyo.
Contracted rooms
If you have assigned an allotment contract (or a so called 'minimum contracted rooms') with Booking.com, you should be aware that the quantity of rooms included in the agreement should be soled only through Booking.com. Our extension is not able to set the availability for such rooms below the contracted allotment (of course unless a reservation was made through Booking.com). In such case, Booking.com will change the availability accordingly with the contracted quantity that you assigned with them. This in some cases can lead to overbooking.
This means that you should offer through Planyo only this number of rooms, that is not contracted with Booking.com. For example, if you have 5 Double rooms set up in Planyo and you have contracted 2 of them with Booking.com, you should offer through your Planyo web site only 3 such rooms. You can set it up by using packages. You can create a package containing the Double room, give it the quantity of 3 and offer it through Planyo. This way, your customers will be able to book all 5 rooms through Booking.com but only up to 3 through your Planyo site.
Resource quantity options
As mentioned, the extension will synchronize the availability between Planyo and Booking.com. When there is a new reservation added in Planyo or when you enter a new vacation, the availability will be automatically updated in Booking.com.
On the other hand, if you change any configuration options in Planyo that could affect quantity of a given resource, please update availability of the assigned Booking.com room manually. You can do this on the [Manual data update] page in the extension.
The configuration options that could affect quantity of a resource can be the quantity value itself but also e.g. package options (when using packages).
Unit names
In Planyo, you can define unit names for a resource whose quantity is greater than one. See FAQ136 for more info about this. On the 'Unit Names' page, you can use the 'Unit assignment for customer reservations' option to choose how the assignment will actually be done for your reservations. If you choose that a unit name must be assigned to a reservation when it is being added, this may cause that a reservation coming from Booking.com is not properly imported into Planyo. This can happen when the reservation dates are actually free, but no single unit is available for the entire rental time.
For example, let's say that you have a resource with the quantity of two and two unit names: yellow and blue. Let's say that on 21th and 22nd availability for the resource is 1. Still, on 21th this is yellow that is free and 22nd this is blue. When pushing data to Booking.com, availability is a flat value there and for both 21th and 22nd it will be simply one for this room. Now, when a client reserves 21th to 23rd at Booking.com, the reservations will be allowed as the room is free. On the other hand, when the reservation is being imported into Planyo there is no single unit that is actually free for both 21th and 22nd. If the 'Unit assignment for customer reservations' option tells that a unit must be assigned, then the reservation will not be imported. In such case, a vacation will be added for the two days to block the period and prevent any overbooking. On the other hand, if the option's value doesn't require any assignment, the reservation will be added successfully.
'Booking not picked up by PMS' email or fax message
Sometimes you can receive from Booking.com a message to your email or fax saying that the IT Provider (Planyo.com in this case) didn't automatically pick up information about a booking.
When a reservation is made by a customer in Booking.com, it will be automatically imported into Planyo and visible among other reservations in your Planyo administration panel. On the other hand, it can sometimes happen that we are not able to receive info about a new or modified booking from Booking.com and will not be able to import it into Planyo. In such case, the reserved period will not be blocked and will still appear as available for other bookings. This can result in an overbooking when another person reserves the same room and days.
In such case (when the IT Provider hasn't automatically imported a booking) the mentioned message is sent to your email or fax. In return, you need to make a manual action in Planyo to actually block the booked period and prevent a possible overbooking. You can do this by adding this booking in your Planyo admin panel manually. You can find full booking data (the arrival and departure dates as well as the customer details) in your Booking.com extranet. Simply searching for the booking ID sent to your email or fax. This way, the newly created booking will block the reserved days and prevent other customer from reserving them again.
Additionally, you should also connect the newly created Planyo reservation to the original booking in Booking.com. You can do this directly in our Booking.com Integration Extension by clicking Booking ID assignment at the bottom of the page. This way any updates coming from Booking.com will be pushed to correct Planyo reservation.